Physical Address
304 North Cardinal St.
Dorchester Center, MA 02124

In this tutorial, I will give you an example of “How to Change the button color based on the status using the Model in Laravel”, So you can easily apply it with your Laravel 5, Laravel 6, Laravel 7, Laravel 8, and Laravel 9 application.
First, what we’re doing here, This is the example :

Before:-

After:-

The status field is almost required in most tables, like the post, comment, product, and order tables.
We mostly use @if @else statements to change the status badge color and the button color on behalf of the status value to identify them easily.
In this article, I will share with you the no more @if @else statements, We will create the easiest and best technic to show status badge and button color dynamically using Model.
Let’s change the span status badge color in laravel blade file
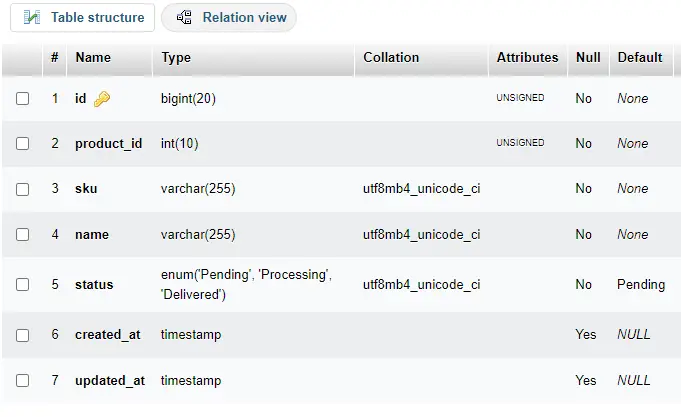
Generating Migration with Model :
php artisan make:model Order -mMigration Structure :
<?php

use Illuminate\Database\Migrations\Migration;
use Illuminate\Database\Schema\Blueprint;
use Illuminate\Support\Facades\Schema;

return new class extends Migration
{
    /**
     * Run the migrations.
     *
     * @return void
     */
    public function up()
    {
        Schema::create('orders', function (Blueprint $table) {
            $table->id();
            $table->unsignedInteger('product_id');
            $table->string('sku');
            $table->string('name');
            $table->enum('status', ['Pending', 'Processing', 'Delivered'])->default('Pending');
            $table->timestamps();
        });
    }

    /**
     * Reverse the migrations.
     *
     * @return void
     */
    public function down()
    {
        Schema::dropIfExists('orders');
    }
};
Run Migration :
php artisan migrate
app\Models\Order.php
<?php

namespace App\Models;

use Illuminate\Database\Eloquent\Factories\HasFactory;
use Illuminate\Database\Eloquent\Model;

class Order extends Model
{
    use HasFactory;
}
We have some dummy Records for testing the status field

routes\web.php :
<?php

use Illuminate\Support\Facades\Route;
use App\Http\Controllers\OrderController;

#Order List with Product Status
Route::get('list/order',[OrderController::class,'listOrder']);
app\Http\Controllers\OrderController.php :
<?php

namespace App\Http\Controllers;

use Illuminate\Http\Request;
use App\Models\Order;

class OrderController extends Controller
{
    public function listOrder()
    {
        $orders = Order::latest()->get();
        return view('orders.list',['orders' => $orders]);
    }
}
Now create a function in Model to fetch Status of every order
app\Models\Order.php
<?php

namespace App\Models;

use Illuminate\Database\Eloquent\Factories\HasFactory;
use Illuminate\Database\Eloquent\Model;

class Order extends Model
{
    use HasFactory;

    #Get Product Order Status
    public function getStatusButtonAttribute()
    {
        $color =
        [
            'Pending'    => 'primary',
            'Processing' => 'warning',
            'Delivered'  => 'success',
        ];
        return $color[$this->status];
    }
}
Now call the Model function in our Blade file

resources\views\orders\list.blade.php :
<div class="container">
  <h3 style="color:#e91e63;">Change the button color-based on the order product status using Model in the Blade file - Laravel</h3>
  <br>
  <table class="table">
    <thead>
      <tr>
        <th>Sr.no</th>
        <th>Name</th>
        <th>SKU</th>
        <th>Status</th>
       </tr>
    </thead>
    <tbody>
    @foreach ($orders as $order)
      <tr>
        <td>{{ $loop->iteration }}</td>
        <td>{{ $order->name }}</td>
        <td>{{ $order->sku }}</td>
        <td>
		<button type="button" class="btn btn-{{ $order->status_button }} btn-sm">{{ $order->status }}</button>
        </td>
      </tr>
    @endforeach
    </tbody>
  </table>
</div>
In this article, we learned “How to Change the button color based on the status using the Model in Laravel”, I hope this article will help you with your any Laravel application Project.
Real also:- How To Write Logics In Model In Laravel 9.