Physical Address
304 North Cardinal St.
Dorchester Center, MA 02124

In this article we will discuss about Laravel Socialite Login with Google Gmail Account, following few simple steps.
To implement social login in laravel is a handy way to simplify the authentication system.
It reduces the time of the user by skipping the registration process. Just link your google account and add Gmail app credentials that’s it.
To get started with Socialite, use Composer to add the package to your project’s dependencies:
For socialite package we run command in our CMD Terminal.
composer require laravel/socialiteLaravel Socialite Complete Documentation : <a href="https://packagist.org/packages/laravel/socialite" target="_blank" rel="noreferrer noopener">https://packagist.org/packages/laravel/socialite</a>After successful installation of the Socialite Package, we add these two things in the app.php file.
 'providers' => [

         Laravel\Socialite\SocialiteServiceProvider::class,


 'aliases' => [

         'Socialite' => Laravel\Socialite\Facades\Socialite::class,
<a href="https://console.developers.google.com/apis/credentials">https://console.developers.google.com/apis/credentials</a>After register the Socialite Package in the app.php file, we register our app in a google account just login with your Gmail account in the given link and create Credentials.
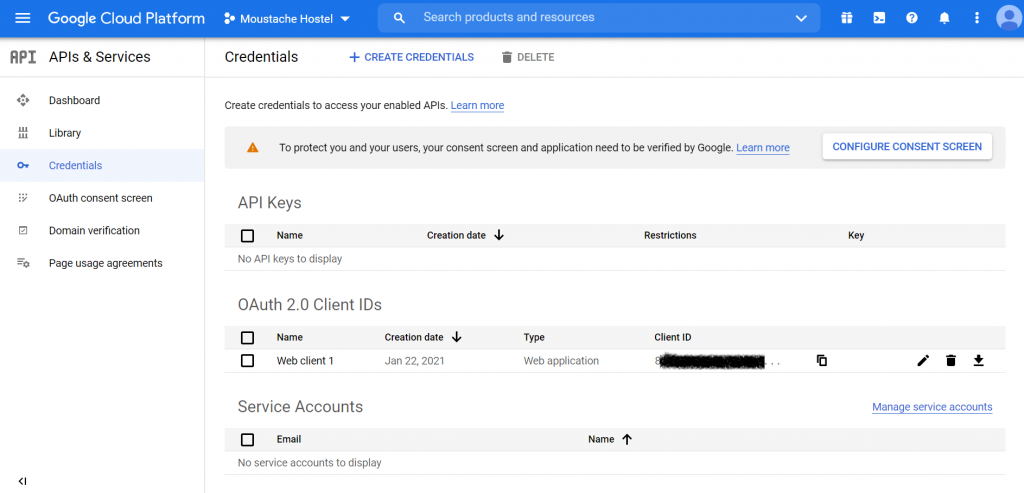
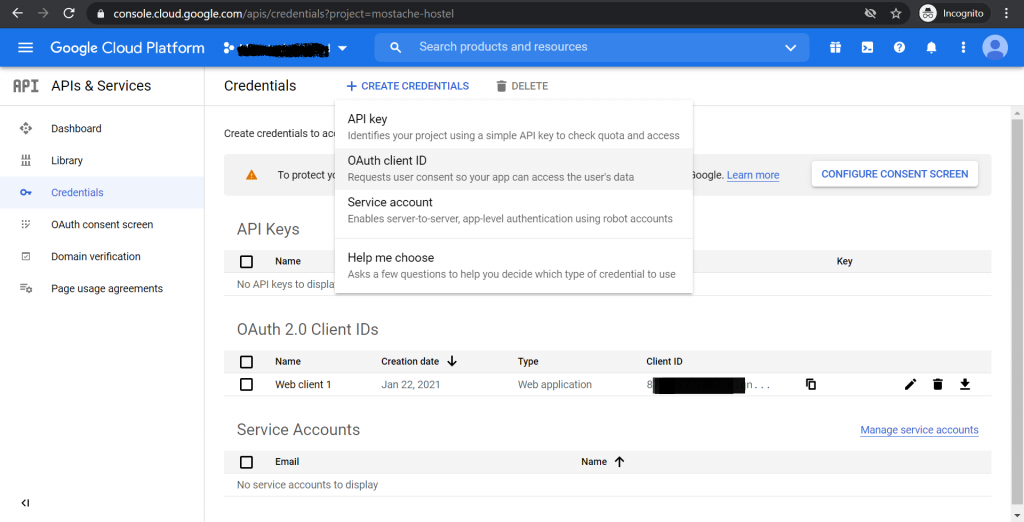
Make sure, select option OAuth client ID
We define call Back URL for our Application.
http://localhost:8000/auth/google/callback
Make sure this call back URL is for our local server, when we use this call back URL this will work perfectly, but when we upload our application on Live Server, make sure Please change your Call back URL in the Developer account and .env file for live Server
Call Back URL for Local Server : http://localhost:8000/auth/google/callback
Call Back URL for Live Server : http://yourdomainname.com/auth/google/callback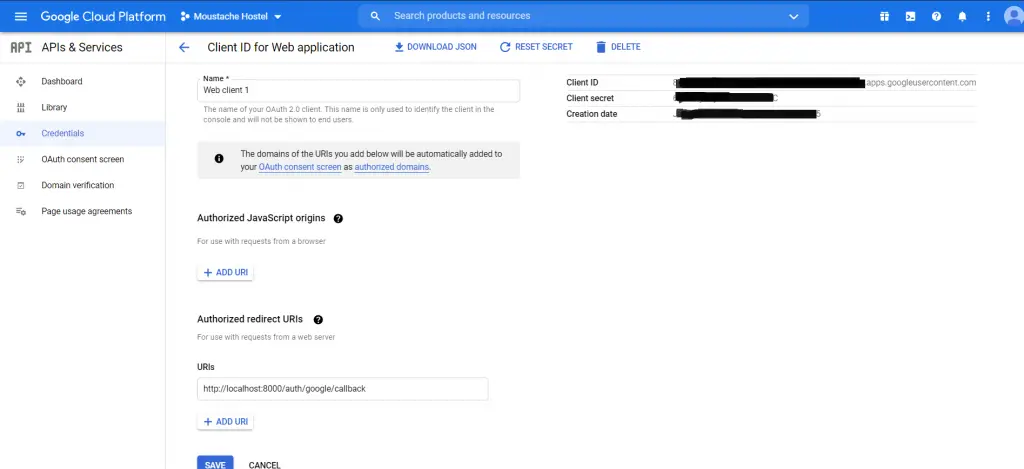
After these step, Please add Google Client ID, Google Client Secret, and Google Url in the .env file, after this Please restart you local server.
GOOGLE_CLIENT_ID=xxxx.apps.googleusercontent.com
GOOGLE_CLIENT_SECRET=xxxxx
GOOGLE_URL=http://localhost:8000/auth/google/callback
After this Please define google account Path in services.php file.
'google' => [
        'client_id'     => env('GOOGLE_CLIENT_ID'),
        'client_secret' => env('GOOGLE_CLIENT_SECRET'),
        'redirect'      => env('GOOGLE_URL'),
    ],
Update your Database Migration file, add the Google_ID field in users migration.
 $table->string('name');
 $table->string('email');
 $table->string('password');
 $table->string('google_id')->nullable();
 $table->enum('user_role',[1,2,3])->comment('1=superadmin,2=user,3=others');
Make sure define (Protected fillable) migration field in User Model.
class User extends Authenticatable
{
    use Notifiable;

    /**
     * The attributes that are mass assignable.
     *
     * @var array
     */
    protected $fillable = [
        'name','email','password','google_id','role_status'
    ];
This is our Blade File, where we add Signup/Sign-in with Gmail Button and pass the route name in action.
<a href="{{route('Gmaillogin.user')}}"><img src="{{asset('frontend_assets/img/gmail.png')}}" class="img-fluid social-icon before-hover"> </a>In web.php we define all routes which we are using on application for Gmail Login in laravel application.
Route::get('/login-register','Frontend\UsersController@userLoginRegister')->name('Loginregister');
Route::get('auth/google','Frontend\UsersController@redirecttogoogle')->name('Gmaillogin.user');
Route::get('auth/google/callback', 'Frontend\UsersController@handleGoogleCallback');
Don’t forget to use Laravel\Socialite\Facades\Socialite; in your controller. here we add functions for Redirect on Gmail and Get GoogleCallback, after successfully getting a callback you will get all information, which data you want to save data in Table.
<?php
namespace App\Http\Controllers\Frontend;

use App\Http\Controllers\Controller;
use Illuminate\Support\Facades\Hash;
use Auth;
use Session;
use App\User;
use Exception;
use Validator, Redirect, Response;
use Laravel\Socialite\Facades\Socialite;
use Illuminate\Http\Request;

class UsersController extends Controller
{
    public function userLoginRegister()
    {
        return view('Frontend.users.loginRegister');
    }
    public function redirectToGoogle()
    {
        return Socialite::driver('google')->stateless()
            ->redirect();
    }

    public function handleGoogleCallback()
    {
        try
        {
            $user = Socialite::driver('google')->stateless()
                ->user();
            $userData = User::where('email', $user->email)
                ->first();
            if ($userData)
            {
                $userData->user_role = '2';
                $userData->google_id = $user->id;
                $userData->save();
                Auth::login($userData);
                Session::put('frontSession', $userData->email);
                return Redirect::to('/')
                    ->with(['userData' => $userData]);

            }
            else
            {

                $userData = User::create(['name' => $user->name, 'email' => $user->email,
                'google_id' => $user->id,
                'user_role' => '2', 'password' => encrypt('user@123') ]);
                //Password is optional you can Send NULL value.
                Auth::login($userData);
                Session::put('frontSession', $userData->email);
                return Redirect::to('/')
                    ->with(['userData' => $userData]);
            }

        }
        catch(Exception $exception)
        {

            dd($exception->getMessage());
        }
    }
}
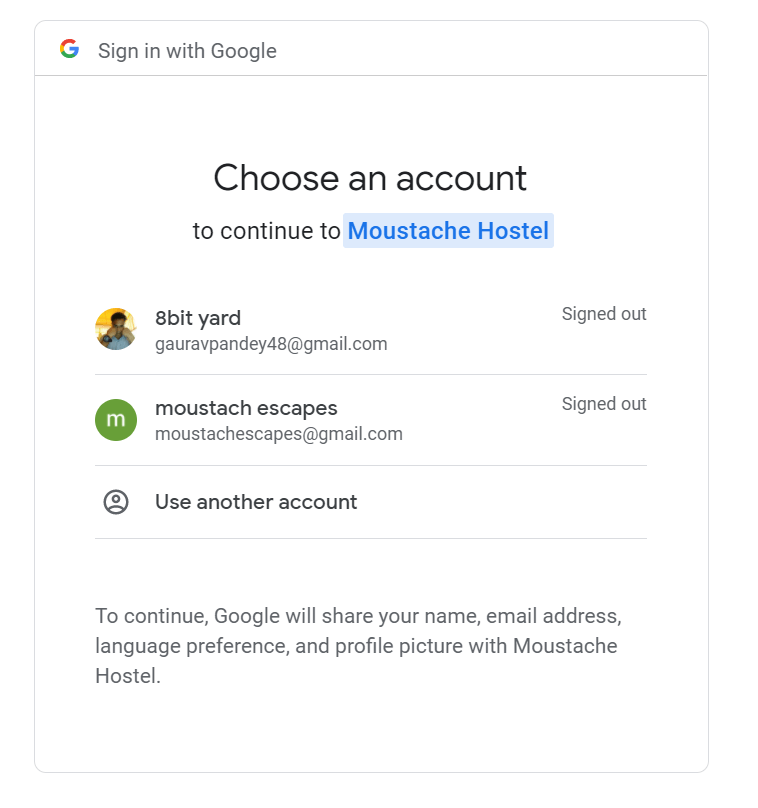
So, in this blog, we learned Laravel Socialite Login with Google Gmail Account, hope you will get perfect Output if you have any query please comment on the comment section below.
Also Read : Laravel Login with Facebook using Laravel Socialite