Physical Address
304 North Cardinal St.
Dorchester Center, MA 02124

In this tutorial, we will learn How to add a column or columns to an existing table using migration in Laravel.
Whenever we create a migration file, we define all necessary fields on our migration file. but sometimes our project or application will be enhanced in the future, then we need to add some columns in the existing migration or database in Laravel.
There are basically two ways to add columns in migration, The first one is you can manually add column and columns in table or migration, and the second is to add new column or columns through migration directly.
create a new migration file to add a new column or columns into the table is an ideal way in Laravel Application.
Let’s see an example, Add a new column to an existing table in a migration.
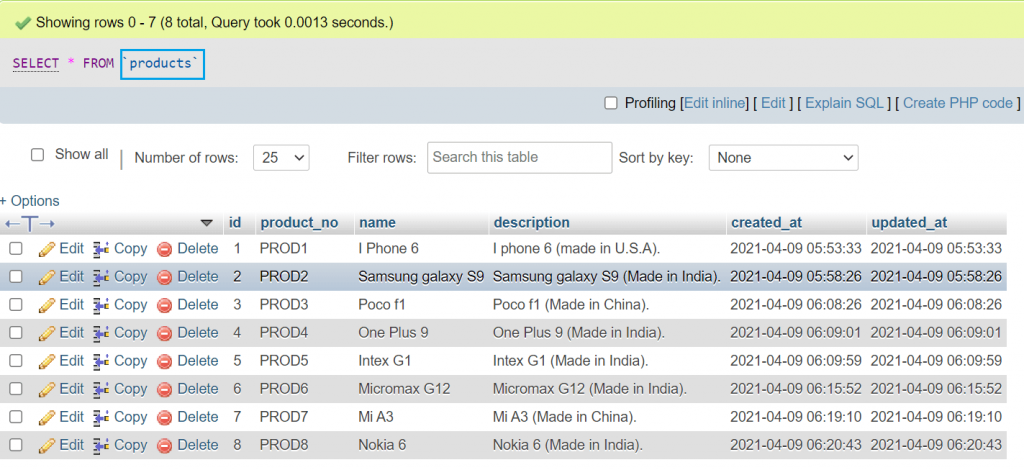
Imagine that, you have a table called products where the table structure is like this.

To add a new column to the existing table in Laravel, you need to run the following command in terminal.
php artisan make:migration add_quantity_to_products_table --table=productsIt will generate an add_quantity_to_products_table file in the migration folder.
Now you are able to add a new column in your migration, that should be like this.
<?php

use Illuminate\Database\Migrations\Migration;
use Illuminate\Database\Schema\Blueprint;
use Illuminate\Support\Facades\Schema;

class AddQuantityToProductsTable extends Migration
{
    /**
     * Run the migrations.
     *
     * @return void
     */
    public function up()
    {
        Schema::table('products', function (Blueprint $table) {
        $table->integer('quantity')->after('name');
        });
    }

    /**
     * Reverse the migrations.
     *
     * @return void
     */
    public function down()
    {
        Schema::table('products', function (Blueprint $table) {
            $table->dropColumn('quantity');
        });
    }
}
Now you just run the following migration command to add a new column in your table.
php artisan migrateand don’t forget to add the rollback option in Migration File:
 public function down()
    {
        Schema::table('products', function (Blueprint $table) {
            $table->dropColumn('quantity');
        });
    }
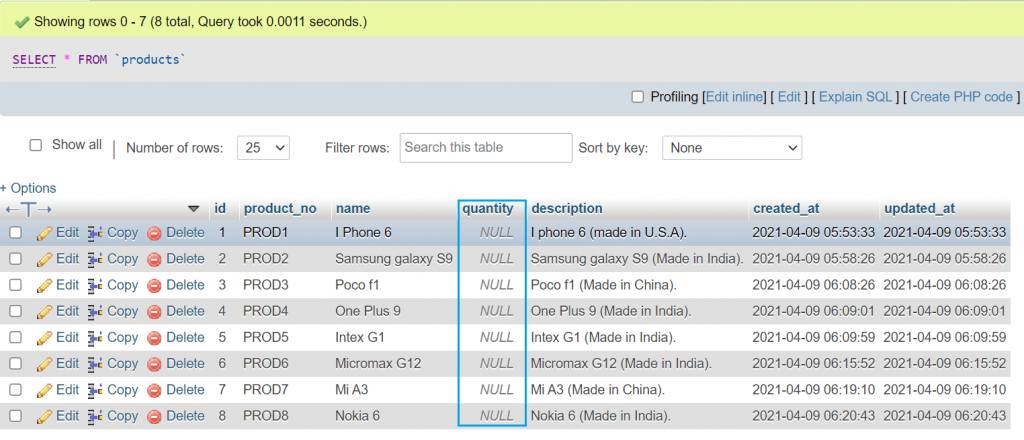
Now you should able to see a new column in products table, that should be like this.

If you need to add multiple columns in migration, you need to add the following command in the terminal.
php artisan make:migration add_color_sku_size_to_products_table --table=productsIt will generate an add_color_sku_size_to_products_table file in the migration folder.
Now you are able to add multiple columns in your migration, that should be like this.
<?php

use Illuminate\Database\Migrations\Migration;
use Illuminate\Database\Schema\Blueprint;
use Illuminate\Support\Facades\Schema;

class AddColorSkuSizeToProductsTable extends Migration
{
    /**
     * Run the migrations.
     *
     * @return void
     */
    public function up()
    {
        Schema::table('products', function (Blueprint $table) {
        $table->string('color')->after('quantity');
        $table->string('sku')->after('color');
        $table->string('size')->after('sku');
        });
    }

    /**
     * Reverse the migrations.
     *
     * @return void
     */
    public function down()
    {
        Schema::table('products', function (Blueprint $table) {
            $table->dropColumn('color');
            $table->dropColumn('sku');
            $table->dropColumn('size');
        });
    }
}
just run the following migration command to add new columns in your table.
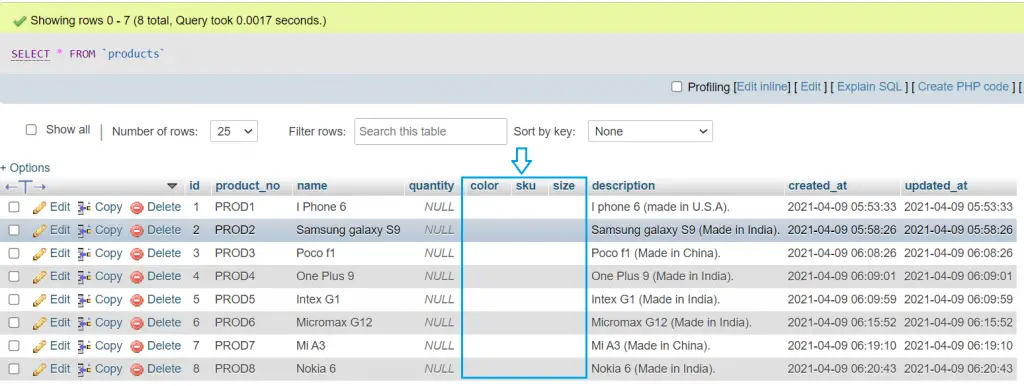
php artisan migrateNow, you are able to see new columns in the products table, which should be like this.

Note : If you want to add a column after a specific column. then use After and then Field name in migration.
like this : $table->string(‘color’)->after(‘quantity’);
In this tutorial, we learned to add single or multiple columns in a table using migration in laravel.
I hope this article will help you with your Laravel application Project.