Physical Address
304 North Cardinal St.
Dorchester Center, MA 02124
Physical Address
304 North Cardinal St.
Dorchester Center, MA 02124

In this article, we will learn how to create secure admin login form using PHP.
we will create a login page of admin, connected with the database, or whose information to log in to the page is already stored in our database.
In the first step, we create a database using XAMPP, the database named “test_admin”
if you have already a database just follow the second step.
In a second step, we create a table name “admin” inside the “test_admin” database.
Now, we add fields and declare type in the “admin” table, The table “admin” should contain 3 fields.

You can add more fields like name, phone, address, etc.
Here, the information of only 1 User, is in the table. you can add as many as you want.

After inserting the values, the table will look like this.

Let’s create a Login Form and its functionality.
Structure : C:/xampp/htdocs/admin_login/
In xampp/htdocs folder we create a folder named “admin_login“.
In the “admin_login” folder we will create 4 files :
In the “login.php” file we create an HTML form for Admin, where the admin can enter his login Credentials
like username and password.
<!DOCTYPE html>
<html>
   <head>
      <meta charset="UTF-8">
      <meta name="viewport" content="width=device-width, initial-scale=1">
      <title>PHP | Secure admin Login</title>
      <link rel="stylesheet" href="https://cdn.jsdelivr.net/npm/bootstrap@4.6.0/dist/css/bootstrap.min.css" integrity="sha384-B0vP5xmATw1+K9KRQjQERJvTumQW0nPEzvF6L/Z6nronJ3oUOFUFpCjEUQouq2+l" crossorigin="anonymous">
      <link rel="stylesheet" href="style.css">
      <script src="https://code.jquery.com/jquery-3.5.1.slim.min.js" integrity="sha384-DfXdz2htPH0lsSSs5nCTpuj/zy4C+OGpamoFVy38MVBnE+IbbVYUew+OrCXaRkfj" crossorigin="anonymous"></script>
      <script src="https://cdn.jsdelivr.net/npm/bootstrap@4.6.0/dist/js/bootstrap.bundle.min.js" integrity="sha384-Piv4xVNRyMGpqkS2by6br4gNJ7DXjqk09RmUpJ8jgGtD7zP9yug3goQfGII0yAns" crossorigin="anonymous"></script>
   </head>
   <body>
      <div class="container">
         <div class="row content">
            <div class="col-md-6 mb-3">
               <img src="login.png" class="img-fluid" alt="img">
            </div>
            <div class="col-md-6">
               <h3 class="signin-text mb-3">Sign In | Secure Admin Login</h3>
               <br>
               <form action="check_login.php" method="post" autocomplete="off">
                  <div class="form-group">
                     <label for="email">Email</label>
                     <input type="email" name="email" class="form-control" required>
                  </div>
                  <div class="form-group">
                     <label for="password">Password</label>
                     <input type="password" name="password" class="form-control" required>
                  </div>
                   <input type="submit" name="login" class="btn btn-class" value="Login">
               </form>
            </div>
         </div>
      </div>
   </body>
</html>
This file is optional you can create a style.css file, or you can define internal/inline CSS.
@import url('https://fonts.googleapis.com/css2?family=Poppins&display=swap');
 body{
	font-family: 'Poppins', sans-serif;
	background-color:#00ac96;
 }
 .img-fluid {
    max-width: 80%;
    height: auto;
 }
 .content{
	margin: 8%;
	background-color: #fff;
	padding: 4rem 1rem 4rem 1rem;
	box-shadow:0 0 5px 5px rgba(0,0,0, .05);
 }
 .signin-text{
	font-style:normal;
	font-weight:600 !important;
 }
 .form-control{
	display:block;
	width:100%;
	font-size:1rem;
	font-weight:400;
	line-height:1.5;
	border-color:#00ac96 !important;
	border-style:solid !important;
	border-width:0 0 1px 0 !important;
	padding: 0px !important;
	color:#495057;
	height:auto;
	border-radius:0;
	background-color: #fff;
	background-clip:padding-box;
 }
 .form-control:focus{
	color:#495057;
	background-color:#fff;
	outline:0;
	box-shadow:none;
 }
 .btn-class{
	border-color:#00ac96;
	color:#00ac96;
 }
 .btn-class:hover{
	background-color:#00ac96;
	color:#fff;
 }
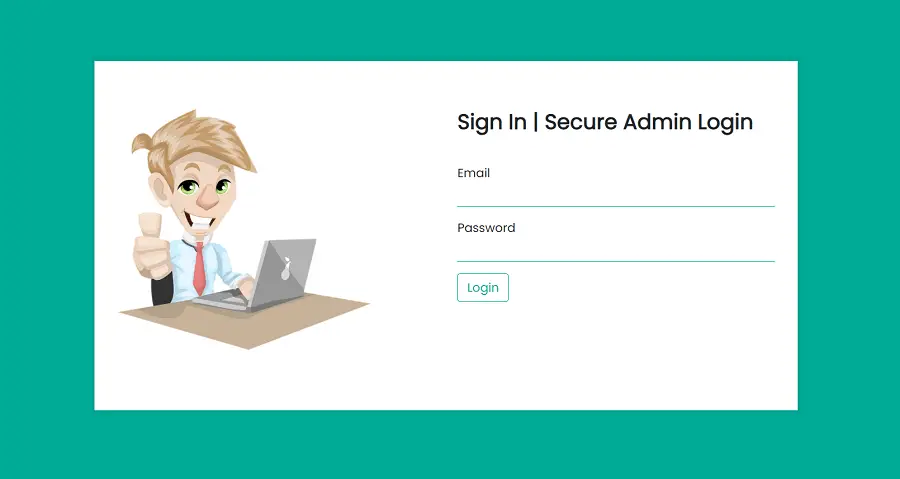
After HTML and adding a style.css file, the form will look like this.

In the Db connection file, we set up our database, username, or password, if you want to learn a complete article about How to Connect to MySQL Database Using PHP ? follow this link.
<?php
$dbservername="localhost";
$dbuser="root";
$dbpassword="";
$dbname="test_admin";
$connection=mysqli_connect($dbservername,$dbuser,$dbpassword,$dbname);
?>
In the “check_login.php” file, we write the login functionality, check request parameters, and match with our “admin_login” table after that we redirect the user, if the user entered valid Credentials it will redirect to the dashboard else if Credentials are wrong, we will display an error message.
  <?php
    include('db_connection.php');
    $username = $_POST['email'];
    $password = $_POST['password'];

        #prevent from mysqli injection
        $username = stripcslashes($username);
        $password = stripcslashes($password);
        $username = mysqli_real_escape_string($connection, $username);
        $password = mysqli_real_escape_string($connection, $password);

        $sql = "select *from admin where email = '$username' and password = '$password'";
        $result = mysqli_query($connection, $sql);
        $row    = mysqli_fetch_array($result, MYSQLI_ASSOC);
        $count  = mysqli_num_rows($result);

        if($count == 1){
            #If Successfully login (Get Session)
            $_SESSION['username'] = $username;
            echo 'welcome :' . $_SESSION['username'];
        }
        else{
            #If entered Wrong Credentials
            echo "<h1> Sorry,Credentials Don't Match.</h1>";
        }
  ?>
If the user entered valid Credentials it will redirect to the dashboard.

If Credentials are wrong, we will display an error message

In this article, we learned “How to create Secure admin login form using PHP”, I hope this article will help you with your PHP Project.